安装- 下载压缩包之后,解压后上传到服务器,以/var/www/94caiji 目录为例。
- 使用的python版本为3.8, 如果当前服务器上安装的不是3.8的版本,建议安装pyenv进行python版本管理。
- 使用virtualenv venv 创建虚拟环境。激活venv . venv/bin/activate
- 安装依赖 pip install -r requestments.txt, 在安装的过程中可能提示错误如下,修改requestments.txt 为 pyppeteer==0.2.6
ERROR: Cannot install pyppeteer==0.2.5 and pyppeteer==0.2.6 because these package versions have conflicting dependencies.- 可能还需要安装cfscrape, 错误如下, 需要安装 pip install cfscrape
ModuleNotFoundError: No module named 'cfscrape'测试[color=rgba(0, 0, 0, 0.87)]执行python3 index.py 看是否可以运行, 如果没有错误,可以正常运行,说明python环境依赖安装完成。 使用Supervisor来管理服务 (不了解的可以上网搜搜)[color=rgba(0, 0, 0, 0.87)]创建supervisor配置文件94caiji.conf [program:94caiji]directory=/var/www/94caijicommand=/var/www/94caiji/venv/bin/python3 /var/www/94caiji/index.pystdout_logfile=/var/www/94caiji/logs/supervisor.logstderr_logfile=/var/www/94caiji/logs/supervisor.logsupervisorctl reloadsupervisorctl status[color=rgba(0, 0, 0, 0.87)]查看94caiji进行是否正常运行。信息如下 正常运行。 (venv) root@debian:/var/www/94caiji# supervisorctl status94caiji RUNNING pid 3649216, uptime 0:00:03配置nginx 和域名(非必须,直接使用IP也可以,端口:9001)[color=rgba(0, 0, 0, 0.87)]创建nginx 配置文件 94caiji.conf server { listen 80; listen [::]:80; server_name yourdomain.com; return 301 https://yourdomain.com$request_uri;}server { listen 443 http2; #listen 443 ssl http2; listen [::]:443 http2; #listen [::]:443 ssl http2; # root /var/www/html; root /var/www/94caiji; # Add index.php to the list if you are using PHP index index.html index.htm index.nginx-debian.html; server_name yourdomain.com; #location /favicon.ico{ # root /var/www/94caiji; #} location /robots.txt { allow all; } location /sitemap.xml { allow all; } location ~ \.txt$ { root /var/www/94caiji; } #static files #location ~ ^\/static\/.*$ { # root /var/www/94caiji; #} location / { # First attempt to serve request as file, then # as directory, then fall back to displaying a 404. # try_files $uri $uri/ =404; proxy_pass http://localhost:9001; proxy_set_header X-Real-IP $remote_addr; proxy_set_header Host $host; proxy_set_header X-Forwarded-For $proxy_add_x_forwarded_for; }}总结[color=rgba(0, 0, 0, 0.87)]配置好nginx,使用域名就可以正常访问了,
94采集器后台管理 默认用户名: admin , 密码: admin 常见问题get_connection-Authentication plugin 'caching_sha2_password' is not supported,文件地址:/var/www/94caiji/app/helper/mysqlDB.pyc,错误行号:32[color=rgba(0, 0, 0, 0.87)]解决方法,安装 pip install mysql-connector-python [color=rgba(0, 0, 0, 0.87)]
[color=rgba(0, 0, 0, 0.87)]方法二:
上传94采集安装包
1)下载最新版本94采集器,上传至Linux服务器
先在自己的Linux上安装宝塔面板,用宝塔面板管理;
将下载的94采集器压缩包上传到服务器上(路径可以自己定)并解压
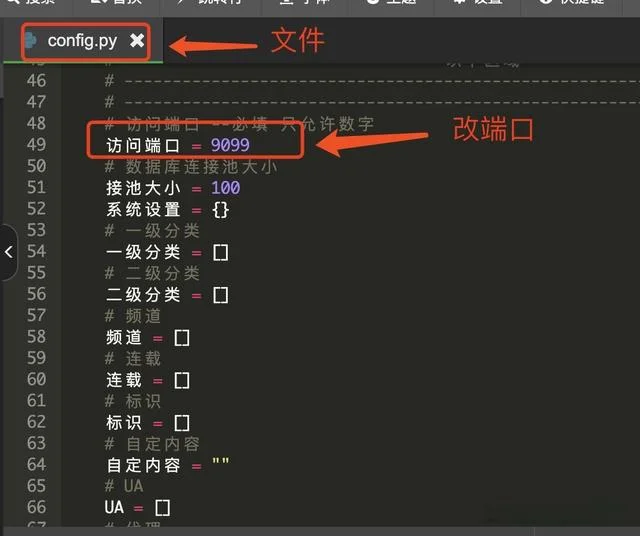
2)找到config.py文件,修改
只修改端口,94采集器作者反馈其他的不需要修改;端口可以自己定义,只要不被占用即可

94采集器文件修改
宝塔安全组放通
登录宝塔面板–》安全,将上面设置的端口放通

安装设置python管理器
注意:如果你宝塔面板中的安全加固功能开启了,请先关闭,不然管理器启动会失败
1)使用宝塔安装python管理器,并利用管理器安装python3.8.5版本


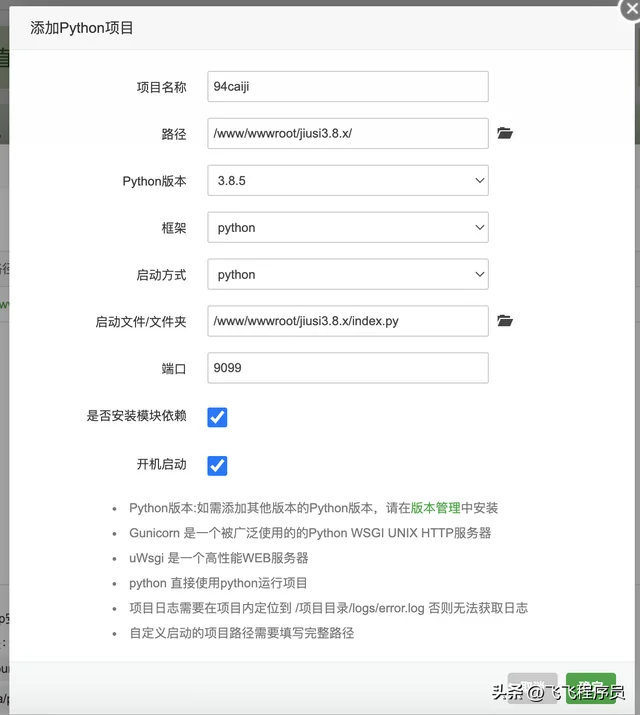
2)添加项目管理
参考下面的设置。

最后你可以用 ip:9099 (ip+端口)或者配置代理域名访问试试。 具体端口不是看宝塔的接口,要看你config.py中设置的端口号。
|